The Untapped Power Behind the Employee ID(s) Global Field

The Employee ID(s) Report Field is a unique multi-instance field that enables you to prompt by employee IDs and do so “en masse”. This field sits on the Global Business Object with Worker serving as the Related Business Object. Its positioning within the object model allows this field to be useful on any business object that has a connection to Worker. This means that business objects such as Time Blocks, Payroll Results, Adjustment For, Staffing Events, and more can leverage this field in reporting and calculated fields!
The use cases I’ll share in this blog are:
- Report on a specific list of workers
- Segregate a list of employees for internal use only
- Aggregate with other Worker data to produce unique lists
- Use in Mass Operation Management (MOM) reports
Getting Started
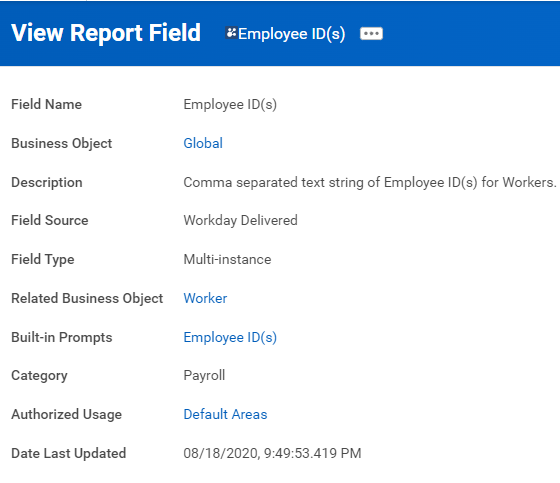
How the Field appears in your Workday tenant:
Add this field to reports and/or calculated fields in Workday then follow these short steps to prepare to make use of it:
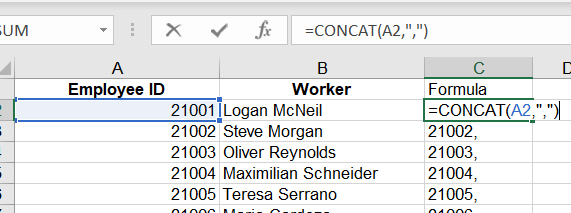
Step 1: Using a custom report built to pull out the unique employees you wish to report on, export the Employee IDs into an Excel or worksheet document. Ensure each unique ID is in one column. Include the Worker field if you’d like.
Step 2: To get the IDs in the format required for your use in new field prompts, write a concatenate formula as follows:
=CONCATENATE(<Employee ID Cell>,",")
It should look something like this:
Step 3: Get ready to copy and paste the results of your new column of data (without the header!) into Workday… more to come on that right away!
The Use Cases
1: Report on a specific list of workers
Let’s assume you need to pull Payroll Result Line data for a list of 1,000 specific workers and your organizational total is greater than 10,000. The standard method would be to run the report at the highest organization level that includes the 1,000 workers (plus others you don’t need), export the list, then create a vlookup formula to apply it against.
A more efficient approach, however, is writing a report filter that specifies “the worker is in the selection list of Employee ID(s)”. Doing so in your custom report creates a required prompt on the prompt tab of the report definition. From there, you can enter all 1,000 employee IDs by doing a simple copy and paste from Excel to Workday!
This method not only saves you processing, exporting, and vlookup time, it is more performant for the report because this would, in most cases, be the most restricting top-level filter you could apply.
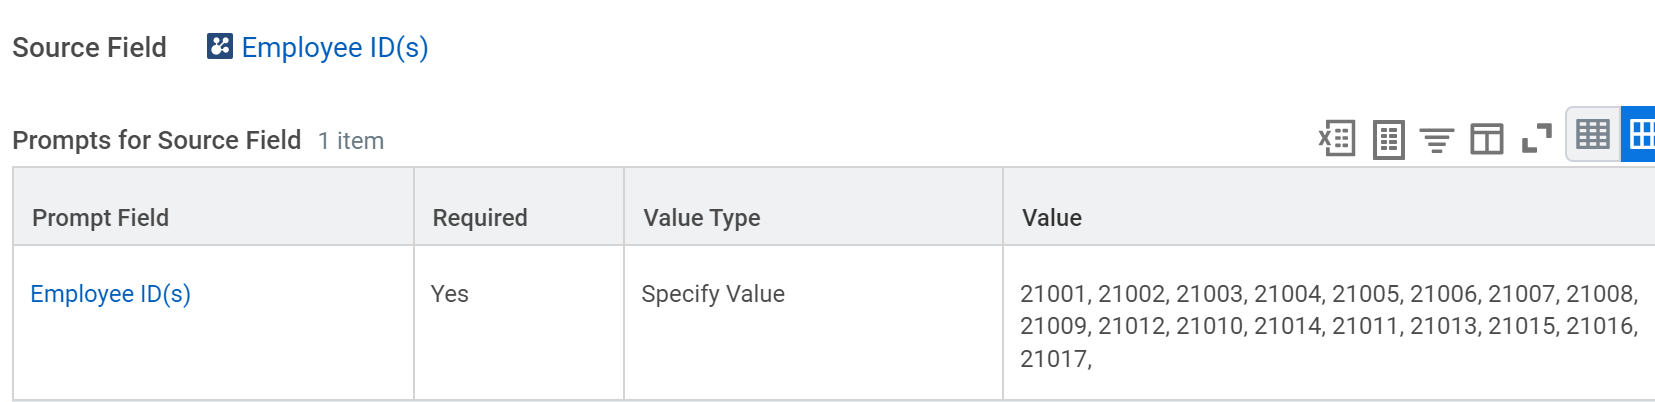
Sample report filter:

This prompt will default because of the type of report field that “Employee ID(s)” is; as mentioned above, it includes a requirement to specify at least one ID to run the report.
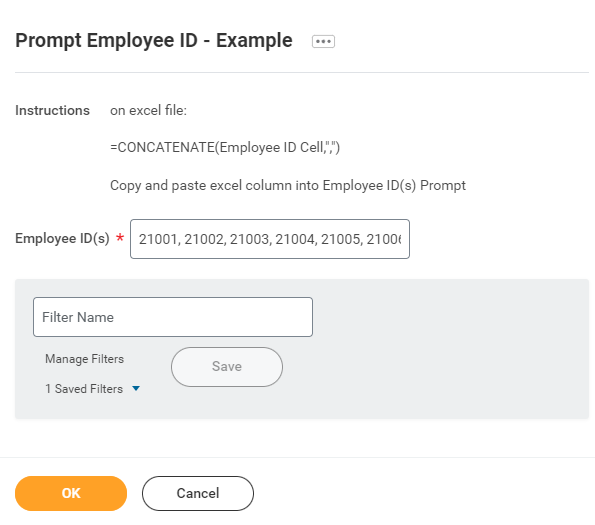
To populate the prompt, go back to your worksheet with the concatenate formula, copy (ctrl+c) the list of IDs, then paste (ctrl+v) them into Workday. The result will be a report output of only the employee IDs you wish to view based on your unique list from the original custom report.
2: Segregate a list of employees for internal use only
Many organizations have employees which they want to exclude from report results. You’ve discussed the situation internally and have come to the conclusion there is no eligibility, calculated field, or custom field you could use to derive a “group” for this list of employees, nor can you establish a new one with ease.
An ideal solution to this problem is found by using the report field in a new “Lookup Field with Prompts” calculated field.
Steps:
- Produce the unique list of workers – this time to exclude from your report – and get it ready in Excel
- Create a calculated field on the Global business object so that it’s accessible to the entire tenant
- Use “Employee ID(s)” as the Source Field
- Paste your unique employee IDs into the calc’s prompt field
- Create filters in all applicable custom reports that specify “Worker is NOT in the selection list of <new Lookup Field with Prompts calc field>”
This approach will save you the time of hard coding your employee ID list into every report to exclude them from the output results, as well as eliminating the required prompt requirement of the field itself. Another bonus is that maintenance of the field is easy! If your list changes, you just need to edit the original calculated field and paste in the new list of employees.
Sample “Lookup Field with Prompts”(LFWP) calculated field:
Sample report filter:

3: Aggregate with other Worker data to produce unique lists
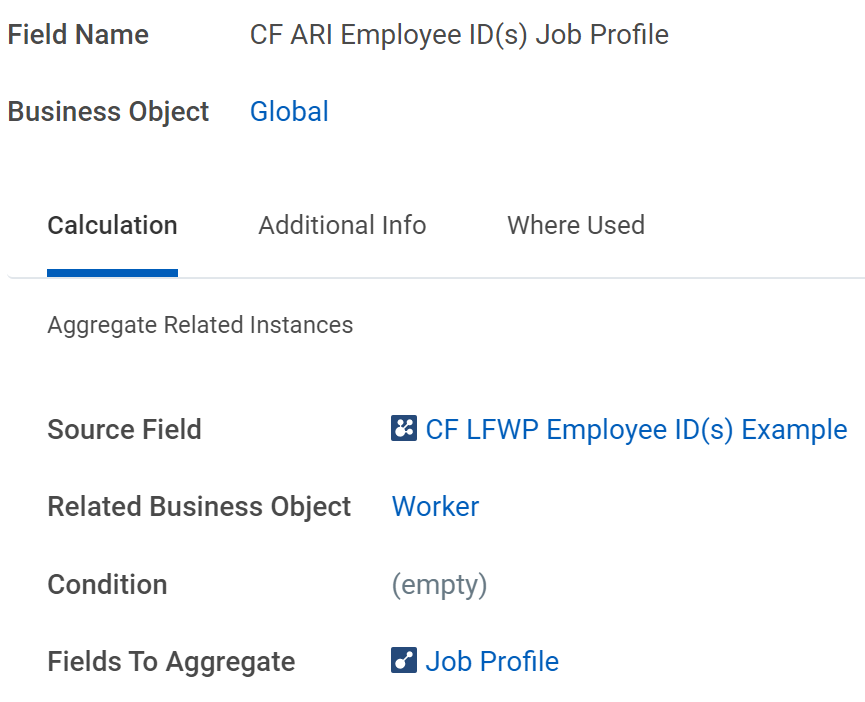
To take the last concept a step further, you can utilize the Employee ID(s) field in a different Lookup Field with Prompts calculated field to hard code the IDs. This would remove the prompt requirement of the original field and establish a worker dataset at the global level that can be referenced across Workday.
Perhaps you have a requirement to determine the distinct job profiles, average salary, management chain, or headcount of your unique employee list. By using a Lookup Field with Prompts calculation in certain other calc fields, you can aggregate, count, sum, or extract additional data about your workforce.
Aggregate Related Instances, Extract Multi-Instance, Extract Single-Instance, Sum Related Instances, or Count Related Instances calculated fields are specific calculation types that will help produce these unique results.
Sample “Lookup Field with Prompts” field used in an Aggregate Related Instances calculation, using Job Profile as the aggregate:
The result of the above calculation, if included in a custom report, is this:
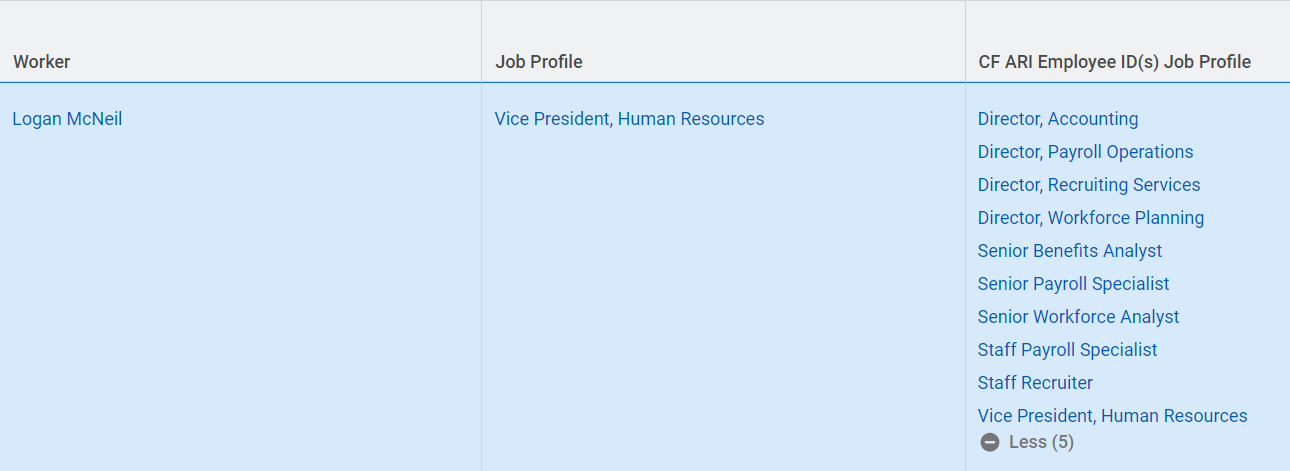
The unique employee IDs included in your LFWP are aggregated based on their Job Profiles! You may have selected 100 IDs to paste into the calculation, but once aggregated, there are only a select number of workers by job profile.
Try this method using the other calculated field types to see what you can come up with!
4: Use in Mass Operation Management (MOM) reports
Mass Operation Management is used to allow members of segment-based security groups to perform mass operations on business processes. Should your use case require you to run a mass operation on a specific population without impacting others, configuring either report filter method (#s 1 or 2 above) will produce the desired result.
A common reason for using MOM is to make mass time approvals. Within your custom report of employees you want to mass approve time for, simply add a filter of either the Employee ID(s) or a Lookup Field with Prompts calculated field and confirm the output. Then use this report in your mass operation to complete the process.
Read more on MOM here: Set Up Mass Operations
Hopefully, these methods deepen your Workday reporting expertise and encourage you to produce more detailed results for your stakeholders. To learn more about or get help with your Workday custom reporting, reach out to us today!