Capital Projects

Are you in the midst of any construction projects, building improvements, software implementations, or equipment installations? Are you tediously using manual entries to move these related expenses out of your WIP account when an asset is ready to be placed in service? If so, there is a much more efficient way to handle these transactions included in your Core Financials subscription thanks to Capital Projects. We find that some clients are processing WIP manually unaware Capital Projects is included in their Core Financials subscription and are therefore not realizing the full benefit of their Workday system. With Capital Projects, in one convenient location you can easily track spending on projects, such as building improvements, equipment installations, and software implementations, that you can then capitalize and depreciate over time or reclassify as an expense.
How to Get Started on Workday’s Capital Project
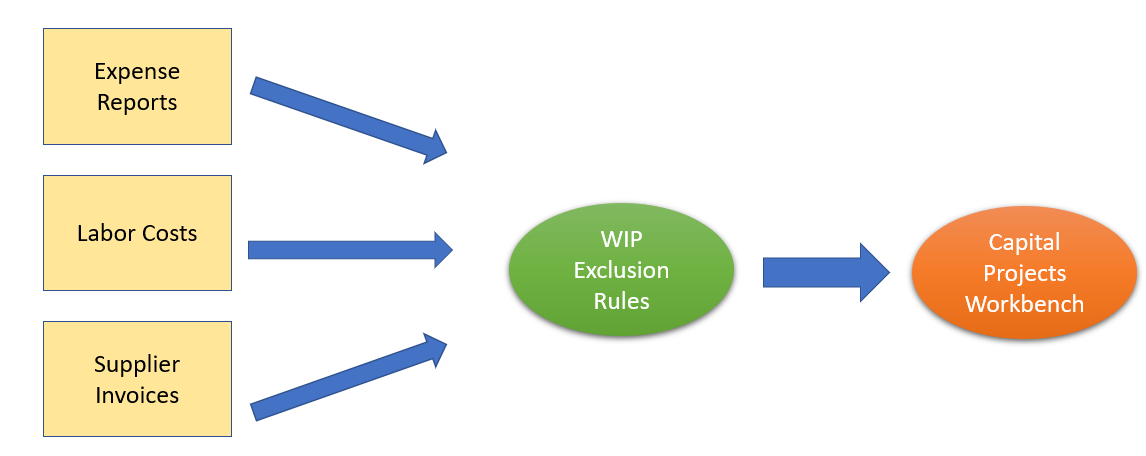
Making sure you have the correct items configured before even creating a capital project is crucial. You will need to add a WIP account if you do not already have one. You can also create WIP exclusion rules to account for any costs you want to track against your project that you would never include in a project asset. Your exclusion rules can classify capital project transactions automatically as expenses or assets, excluding them from manual WIP accounting. This allows you to resolve these transactions automatically using the spend account posting rule. This posting rule streamlines accounting and eliminates the need for review.
On the “Edit Tenant Setup-Financials” task you can define the level of detail for the journal lines generated from the “Work in Progress” posting rule. You can add these worktag types in the “Include Worktag Types” in WIP section for:
- Expense report lines and itemizations
- Labor cost summaries from fully burdened and standard costing summarization methods
- Supplier invoice line and line splits
- Supplier invoice adjustment line and line splits.
You can also enable the posting of WIP to company asset book codes for multibook asset accounting. Security will need to be added to the following domains:
- Manage: Capital Projects
- Manage: Capital Project Labor Costing
- Set Up: Capital Projects
As for business processes, you will need to create the following:
- Asset Registration Event
- Verify Capital Project Labor Cost Summarization
- Verify Capital Project Expense
An important note for Verify Capital Project Expense is that off of the business process policy, be sure you add initiating security groups to all five “Review Capital Projects Transactions” areas.
These areas include: Express, Expense Reports, Supplier Invoices, Labor Costs, and Manual Journals. This is essential or you will not be able to review the associated transactions on your capital project.
Creating Your Capital Project
Now it is finally time to start creating your capital project!
First, create a project hierarchy, as it is a requirement to add a project to a hierarchy before doing anything else. As you are filling out the project summary, be sure to check the little box on the right hand side for capital! On this screen you can add worktags associated with the project, such as location, cost center, business unit, and more. You can also add role assignments, a project plan, and a resource plan, but more on that in a future blog as today we are just focusing on the capitalization feature of capital projects.
Once your project is approved, go to the project and select the Financials tab and then the Capitalization tab below that. Here is where you add your project assets, which allows you to capture separate, ongoing costs of a capital project that is in progress. A project asset can have any name you like but is defined by a single “tracked” spend category. This will be the spend category that asset will have once it is capitalized and has become a true business asset in the tenant. You can add as many project assets as you need, each with a unique spend category.
Now that you have all these project assets set up, how do you get any costs populated there? First, you will need to tag transaction lines with a capital project or one of its phases or tasks. You can tag the following transactions:
- Supplier invoice lines, including line splits
- Expense report lines, including line itemization
- Transactions that result in labor costs (such as time tracking, payroll costing allocations, and payroll input)
- Manual journal lines with a WIP ledger account
- Financial accounting adjustments
Reviewing Transactions
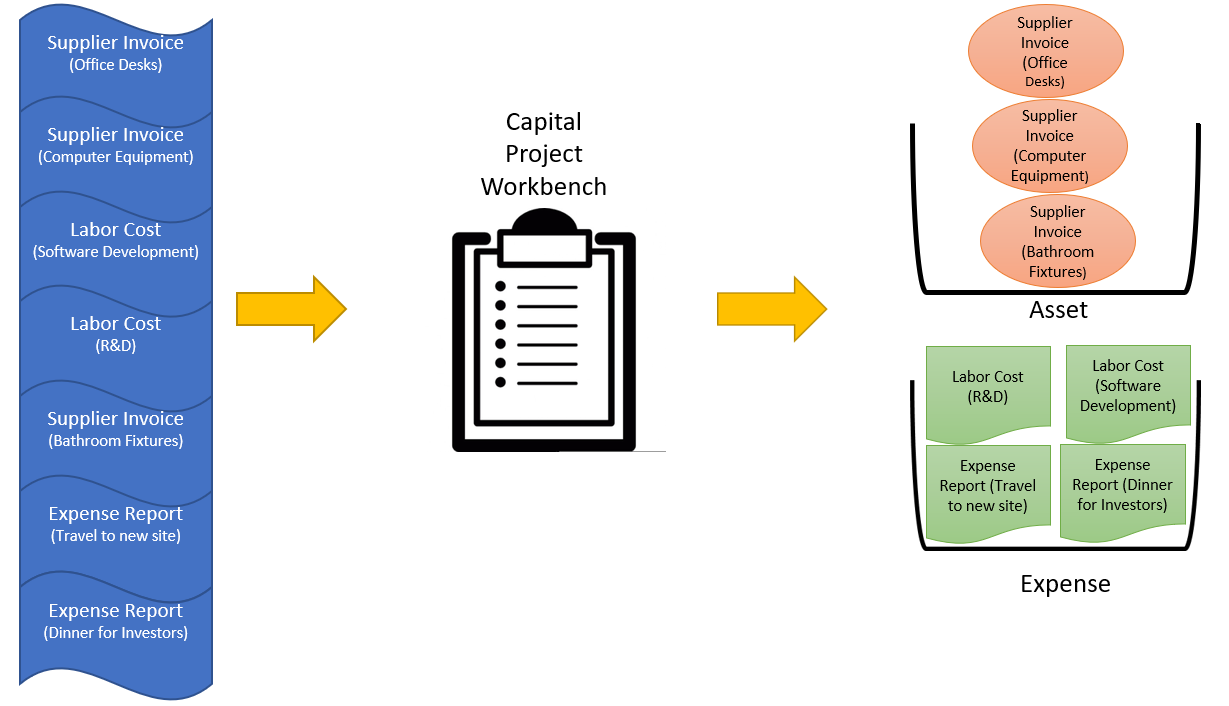
Once you have transactions tagged with your project, it is time to review them within the project. Under the Capitalization tab, click on the Review Transactions button and select a review option. Use Express Review to review all new, unassigned transaction lines tagged to the capital project for all capital transaction types. Review transaction lines by transaction type, such as expense reports or labor costs. This review method enables you to work with new transaction lines as well as the transaction lines you’ve already assigned to project assets. Once you select the transaction lines, you have three actions you can apply to the transaction lines:
Mark as Expense Cost– Reclassifies the transaction line costs as a project expense not associated with any asset. This option doesn’t apply to manual journal entries. You apply their costs directly to WIP accounting when you create a manual journal. There’s no original spend account in which to reclassify the costs. You can’t reverse this choice after you submit.
Assign to Project Asset– Associates the transaction line costs with the correct project asset for this capital project. You can assign multiple transaction lines to the same project asset.
Set Project Asset Values to Blank– (Non-express only) Reset assigned lines to unassigned. Use with the “Only Transactions Already Assigned” check box in the Search Criteria. Example: You can use this option when you incorrectly tie transactions to a project asset.
As a result, for transaction lines marked as expense during the review, Workday initiates the Verify Capital Project Expense business process. A reviewer can confirm that the transactions are expenses not related to any project asset. Once approved, the business process moves the expense costs out of the WIP account and into the proper spend account. This movement is based on your Spend account posting rule and the spend category from the original transaction line. For transaction lines assigned to project assets, Workday retains the costs in the WIP account. These costs display in the Project Assets section of the capitalization tab as Uncapitalized Cost for the selected project asset.
Capitalize Project Assets
When it is time for your projects assets to be capitalized, next to the “Review Transaction” button is a Capitalize Project Assets button which you will now select. Select the project assets with uncapitalized cost that you want to capitalize. Note you can change the Capitalization Date to a date in the past or future for any asset that you haven’t yet capitalized. For example, if you acquire an asset, but don’t enter it into Workday until a month later, you can back date the Capitalization Date. This function enables you to have accurate acquisition and in service dates after you capitalize the project asset into a business asset. For previously capitalized project assets that have new uncapitalized cost that you want to mark as a post-acquisition cost adjustment, select the “Post Acquisition Adjustment” check box and Select the Adjustment Date. These selections determine where on the depreciation schedule Workday adds the post-acquisition cost to the business asset. The cost is divided by the remaining periods on the asset depreciation profile and the selected date.
When you submit the transaction for project assets capitalized for the first time, Workday initiates the Register Asset Event business process. The Assign Asset Accounting Event step of the business process generates journal entries. These entries move costs out of your Work in Progress (WIP) accounts and to the business assets. This step displays as an inbox item for the asset accountant. For recapitalized project assets, Workday initiates the Asset Cost Adjustment Event business process. This process adjusts the acquisition or post-acquisition cost of the corresponding business assets. It also generates journal entries to move post-acquisition costs out of your Work in Progress (WIP) accounts and to the business assets.
While most of what was discussed was done off of the project itself, it is important to note you can do most of these tasks on the Capital Project Workbench task as well.
From here you can:
- Search for pending actions by project, project hierarchy, spend category, and worktags
- Filter search results and apply individual or mass action
- Assign to project asset, reclassify to expense, and capitalize a project asset
- Create a project asset
And ta-da! After following all the steps above, whether off the project itself or on the Capital Project Workbench, you now have your newly created business assets. You can then add to these assets at any point in the project. And most importantly you now have one convenient location where you can easily track spending on your projects.